How to Design Your Own Website in 2026
A 7 step guide to breaking down the website design process,
so it doesn’t seem so overwhelming! (updated for 2026)
Building your own website in 2026 can feel overwhelming. You may be wondering where to start, how to choose the right fonts and colors, what content actually matters, does SEO still matter, or whether you need to know how to code at all. If you’ve ever thought, “I just don’t know where to begin,” you’re not alone.

Here’s the good news! —> We live in a time where tools are available to help make designing a website easier than ever!
This guide is designed to take the guesswork out of the process.
I’ll walk you through building a website step by step, breaking everything down into simple, manageable pieces—so you can move forward with clarity and confidence.
Here’s a quick look at the seven steps to designing your website:
(I’m going from big picture to details, so keep reading for the full scoop on how to tackle each step!)
Pick a website platform (my personal pick + why)
Pick a domain name for your website (and how)
Decide on your website’s style.
If you don’t already have one, this will become part of your brand. Very simply put: how people recognize your business. Your website’s style includes these elements:
Website Content
↳ Website copy (+ FREE Website Copy Template!)
↳ Photos
↳ Blog posts
Decide what integrations you’ll need.
(These are the things that help your website talk to other platforms.)
↳ Newsletter/email marketing integrations
↳ Contact forms
↳ Social media integrations
↳ Payment processers
Etc…
Add SEO (Search Engine Optimization)
Think of it as a smart way to help your site get noticed by search engines like Google, AND yes - AI too.
Beyond your launch.
What should you do to help give your website a boost when you first launch!
Let’s start with the first item on that list: choosing a platform.
No.1 | What website platform should I use for my small business?
↳ Squarespace, Wordpress, Wix, Bluehost… These are all examples of website design platforms. And the good news? You don’t have to know how to code to create your website!
Is Squarespace a good website platform?
I haven’t tried every website platform available, but of the ones I can attest to is Squarespace. It’s fantastic! One of THE main reasons I use Squarespace to build on is ease of use for my clients once I handoff their newly created website to them. It’s an intuitive, user-friendly platform. Squarespace makes it easy for my clients to update their sites as needed, and it’s is also great for business owners who want an easy-to-navigate platform for creating their own website.
↳ PLUS, their IT team is top notch! I’ve worked with many IT teams in various work settings, and Squarespace’s support team is beats them all. They make you feel heard, understood, and best of all —> not ridiculous for reaching out to ask WHATEVER question related to your Squarespace website that you may have!
↳ Do your research, see which website platform best fits your needs, and step 1 is done!

No. 2 | Pick a Domain Name
First, what’s a domain name?
A domain is simply your website’s address on the internet (for example, yourbusinessname.com).
Aim for something short, clear, and easy to remember—ideally a name that reflects your business, brand, or the problem you help solve. Avoid hard-to-spell words, extra numbers, or hyphens. And if you’re a business, try to stick with a trusted extension like .com whenever possible. Most importantly, choose a name that feels aligned with where your website (and business) is headed, not just where you are today.
Where should you get your domain?
Website platforms make it super easy to obtain your domain! Most website platforms have domain selection as a part of their set up process. Here’s an example from Squarespace.
TIP: Try to get your domain from your website host. This will make things more simple for you in terms of having your web host and domain host all in the same place.
No.3 | How to begin designing your own website
STEP 1: You’ll need inspiration!
If you’re going it alone by building your own website, getting inspiration from other sites is an excellent place to begin! You can find this inspiration by looking at other websites in a similar industry like yours. Evaluate what you like and don’t like about what’s being done on their site.
“Isn’t this cheating?” you ask. “Won’t this make me look just like all the other websites in my industry?”
No, it’s not. To be clear, you are not copying anyone’s website. (Please don’t!) You’re merely gaining inspiration! And no, you won’t look just the same, because you’ll intentionally add what makes your business unique to your own website.
Sidenote: Many of the greatest creatives in history learned from those who went before them. Well known artists, musicians, writers became really good at what they did because they were inspired from and mirrored their artistic endeavors.
So here’s what you do: Browse websites in your industry and make a list of the ones you are really drawn to. Aim for 2-3 websites that you resonate with, and make note of the following items:
What do you like about how their website makes you feel? (at ease, welcome, relaxed, etc…)
What does their website make you want to do? (subscribe, sign-up, purchase, contact, etc…)
Do you like their use of colors and fonts? Name what it is that you like.
Why are you drawn to their overall layout? (where they put their photos and text)
If you’d like some extra inspiration for your project, feel free to pop over to my designs page!
Once you’ve gathered this inspiration, use it to guide you as you create your own “flavor”, so to speak.
How?
STEP TWO: Take that inspiration and begin making it your own.
FOR FONTS & COLORS: head over to a place such at Pinterest or Canva and search for images that evoke similar emotions, reflect colors and fonts that you’re drawn to and put them together in a mood board. Here’s what you do:
Putting on your business hat, pin any images that you feel radiate the look and feel of your business
Include images that contains fonts and colors that you’re drawn to
Try to obtain between 15-20 pins
Once gathered, take a step back and look at the “big picture” of what you’ve pinned and look for the following:
Similarities and trends between the images
What colors keep repeating themselves?
What font similarities keep popping up?
You’ve now got the baseline for what you want to use for the colors and font of your website!
Most website platforms have the ability to search their database of color schemes and fonts available. Use what you’ve gathered from your Pinterest board to make these selections in you website platform of choice.
STEP THREE: Take that inspiration and begin making it your own.
It’s now time to begin creating the layout of your website. My tip here: instead of thinking of a layout for your entire website all at once, start small! Only focus on one section at a time. (You’ll thank me later! ☺️)
What do I mean by this? Let’s take a look at how this works on Squarespace…
Squarespace’s website pages are comprised of sections. You can add image and text blocks (and many other blocks) within these sections. See image below. The sage-green background represents one section in Squarespace. The blue outlines represent the image and text blocks that make up the content within this section.
Make one of these sections at a time. And, if you’re using my free Website Copy Template (see below), you can make each section to represent each question from the template.
TIP: Create 4-5 different sections. You can then use these same sections throughout each page of your website. Two bonuses here:
You won’t be re-inventing the wheel on every page of your website.
AND, you’ll have a cohesive and continuous look throughout your website.
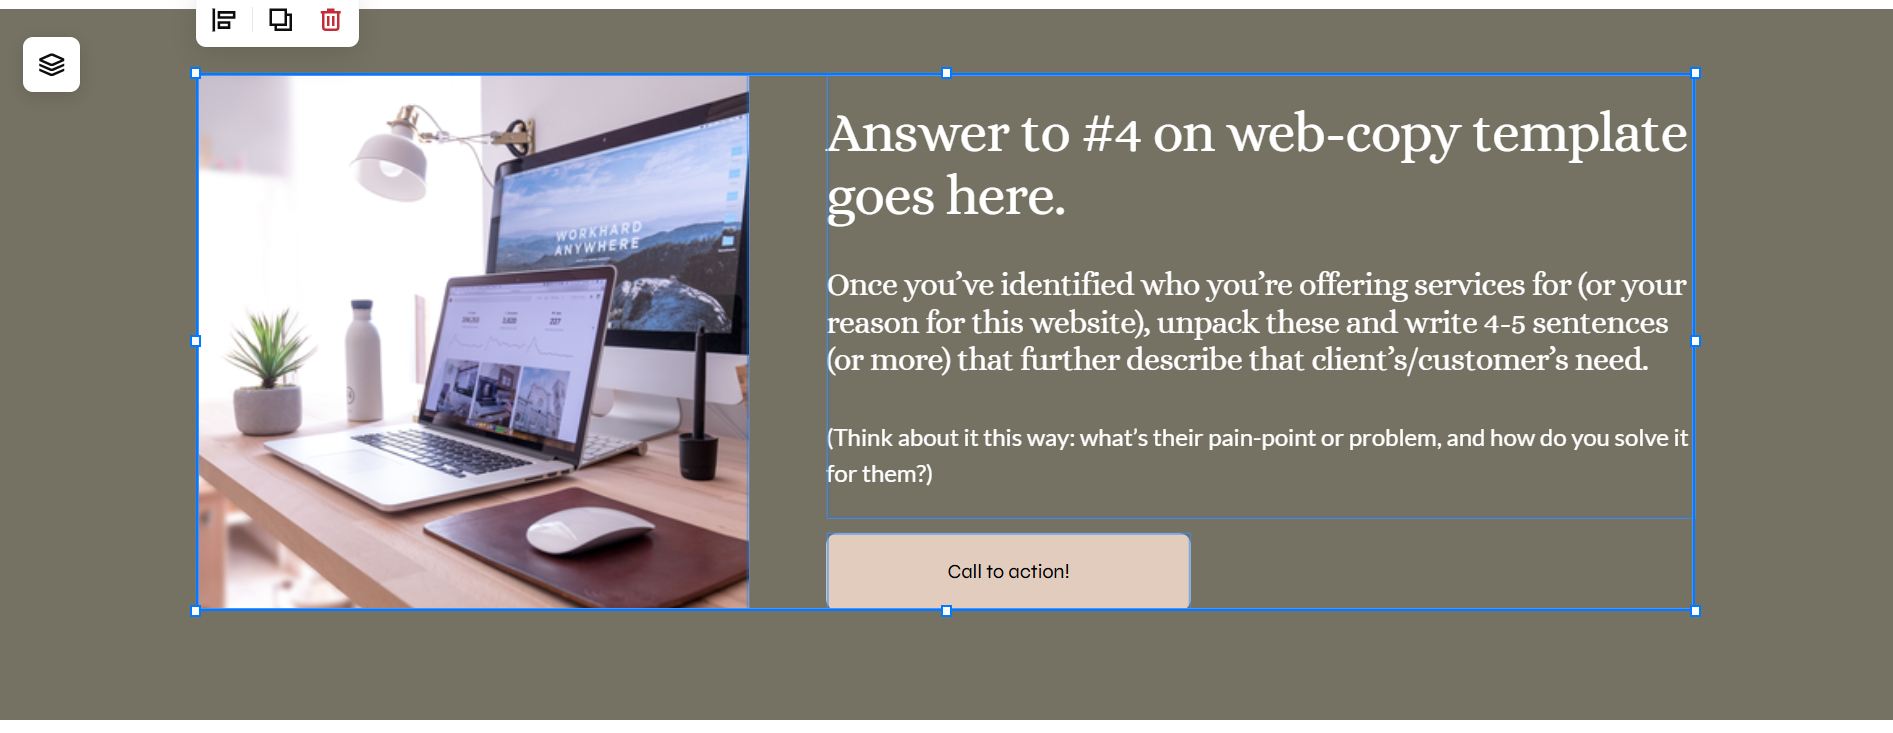
When creating the layout for your website, start small. Focus on creating one section’s style at a time. The sage-green background in the image above represents one section in Squarespace. The blue outlines represent the image and text blocks that make up the content within this section.
HOW TO BEGIN MAKING THE LAYOUT FOR THESE SECTIONS: Use Pinterest or the website samples that you’re drawn to for inspiration, and make a few sketches of the aspects of their layout that you liked. Don’t worry, no need to be the next Michelangelo here. ☺️ Just simple pencil to paper drawings of where you’d like your photos and text to go.
The website page on the left is a page from a website I designed (anniekwarner.com), and the image on the right is the example of you sketch out the layout you’re drawn to.

Webpage sketch example. The Xs represent where photos are placed and the lines represent buttons. You can label it however it makes sense to you since you’ll be using this create your own layout.
No.4 | Next up: How to come up with website content?
What your website looks likes communicates just one part of who you are and the services you offer; your website content tells them another story using text and photos.
WEBSITE COPY
You may be scratching your head wondering, “where do I start with my website copy??” I’ve got you covered! ↴
You can grab my FULL website copy template that I use with my website design clients. As mentioned above in step 3, you can use the website copy as not only a guide for what to say but also for each individual section you create.
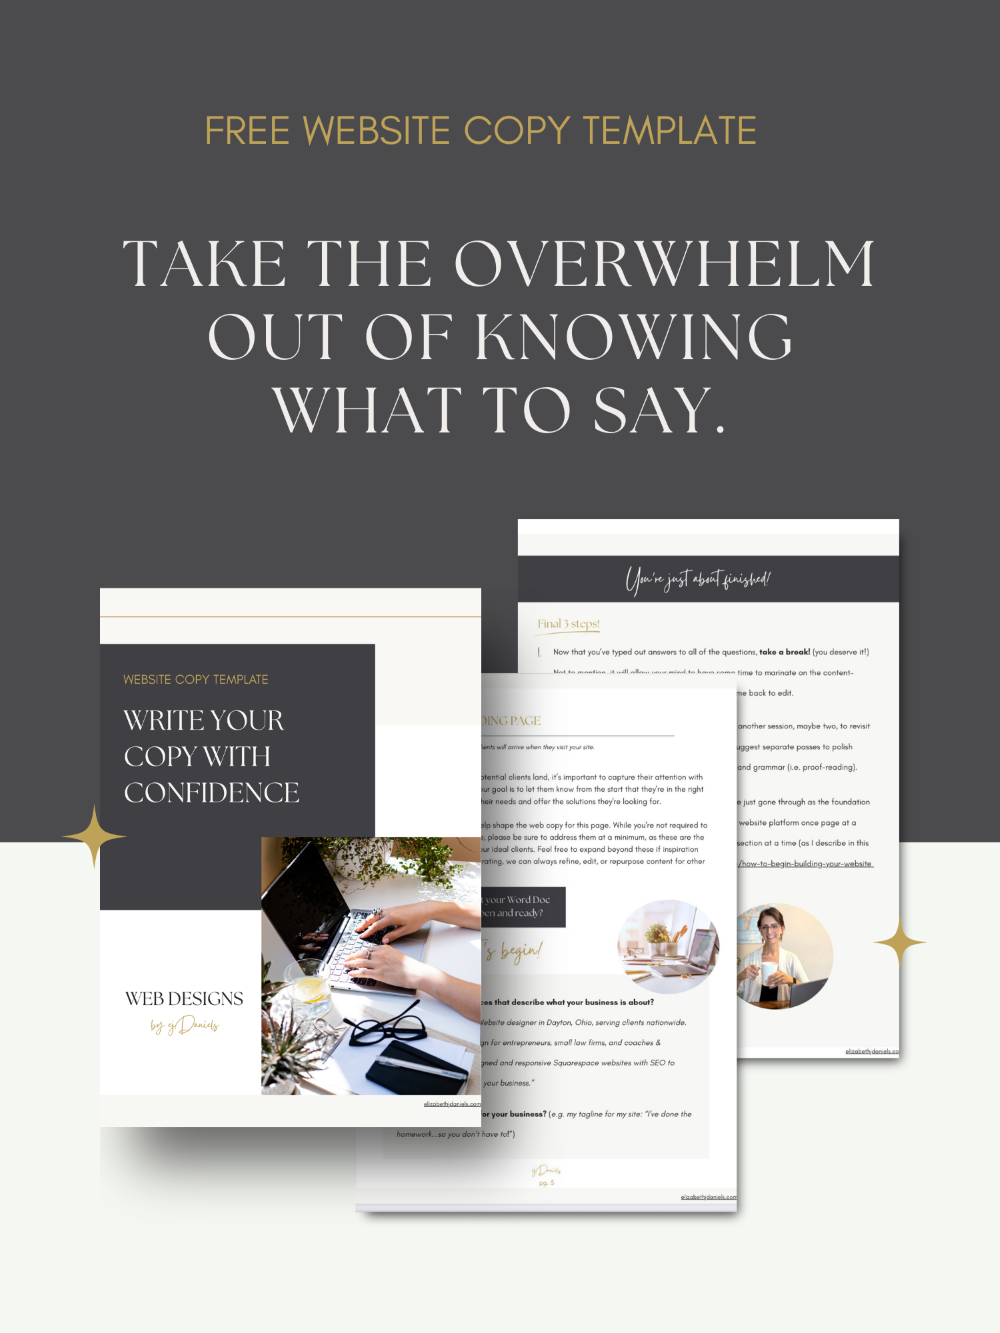
My FULL Website Copy Template includes content generation ideas for your website’s Homepage, About Page, and Services Page. Plus, I guide you through helpful steps that get you mentally prepared to get lay the foundation for your copy!
Claim your FREE Homepage Website Copy Idea Generator here!
WEBSITE PHOTOS
As for photos, people connect with people.
Psychology shows that we are naturally drawn to, trust, and favor websites that feature photos of people. It's even more effective when those photos include you and your business team! Good photos on your website tell your story without saying a word. It creates trust, helps your audience feel a connection, and sets the tone for your brand.
↳ Need high-quality, professional photos? I highly recommend Laura Harstad, a digital branding photographer who can capture beautiful, professional photos—no matter where you’re located in the world.
↳ You can find other photos by using free resources such as Canva or a paid resource such as Élevae that speak to the type of feel you want your website to evoke. Go back to your mood board you created for inspiration and direction on what kinds of photos to select for your site.
Size and name your photos well. ⤵️
A good width for your photos is at least 1500px - 2000px. Anything smaller could appear blurry. Anything bigger could slow down your website and negatively impact your SEO.
Make sure that your image size is compressed to 250 to 500kb.
You’ll want name your new images BEFORE they get uploaded to Squarespace. Unnamed images are a ding against your SEO. Named images help to boost your SEO. Try to name your images something relevant to the content on your page (instead of something like “IMG 5778.jpg”). If you can, sneak in an SEO keyword in the name—bonus points!
BLOGGING
Is Blogging Really Worth It? The short answer: yes!
Think of it this way: Blogging is free marketing.
Each time you publish a blog post, you’re creating fresh content that search engines, like Google, can use to point potential clients to your website. Even if you write just one post per month, that’s twelve new opportunities each year for your ideal clients to discover you online.
So, if you’re looking for an organic way to bring traffic to your website, be sure to set up a blog on your new site. I’ve got two posts that can help you out with this:
No.5 | What integrations does my website need?
Think about your workflow for the service you’re offering. And if you haven’t done so already, write out your workflow! This will help you greatly when figuring out what types of integrations you’ll need.
These are some questions to get you started thinking about what types of integrations you may need, plus some suggestions on specific types:
How will your potential client contact you for set up a discovery call? (Depending on your workflow, either using a Contact Form (already built into Squarespace) where your potential client messages you and you manually schedule the appointment, or Scheduling platform such as Calendly, and Google’s Appointment Scheduling if you want potential clients to pick an available time off your calendar).
How will you keep your schedule? (i.e. how will your client book their appointments on an ongoing basis?)
What method will you use to collect payment from your clients? (Payment Processors such as Stripe)
How will you collect taxes? (very important if you’re required to do so for the type of product or service you offer. If you’re using Squarespace, Taxjar is an example of an auto-calculating integration)
Are you using email marketing or any other funnels to attract clients? (Squarespace’s Email Campaigns is a pretty straightforward service if you’re already going to use Squarespace as your website platform)
No.6 | SEO (Search Engine Optimization) for your website
Taking some time build in SEO into your website will help give your site a boost. Search Engine Optimization matters because it tells the internet search bots on the world wide web whether your site is worth popping up in someone’s search results. It helps get potential clients and customers to your website. SEO is just one of the ways to get a leg up in getting noticed - even in our AI search-forward world. (AI’s pull from SEO as well)
Not sure where to begin with adding SEO to your website? I’ve got you covered! :) I’ve created a FREE SEO checklist for Squarespace which you can claim right here!

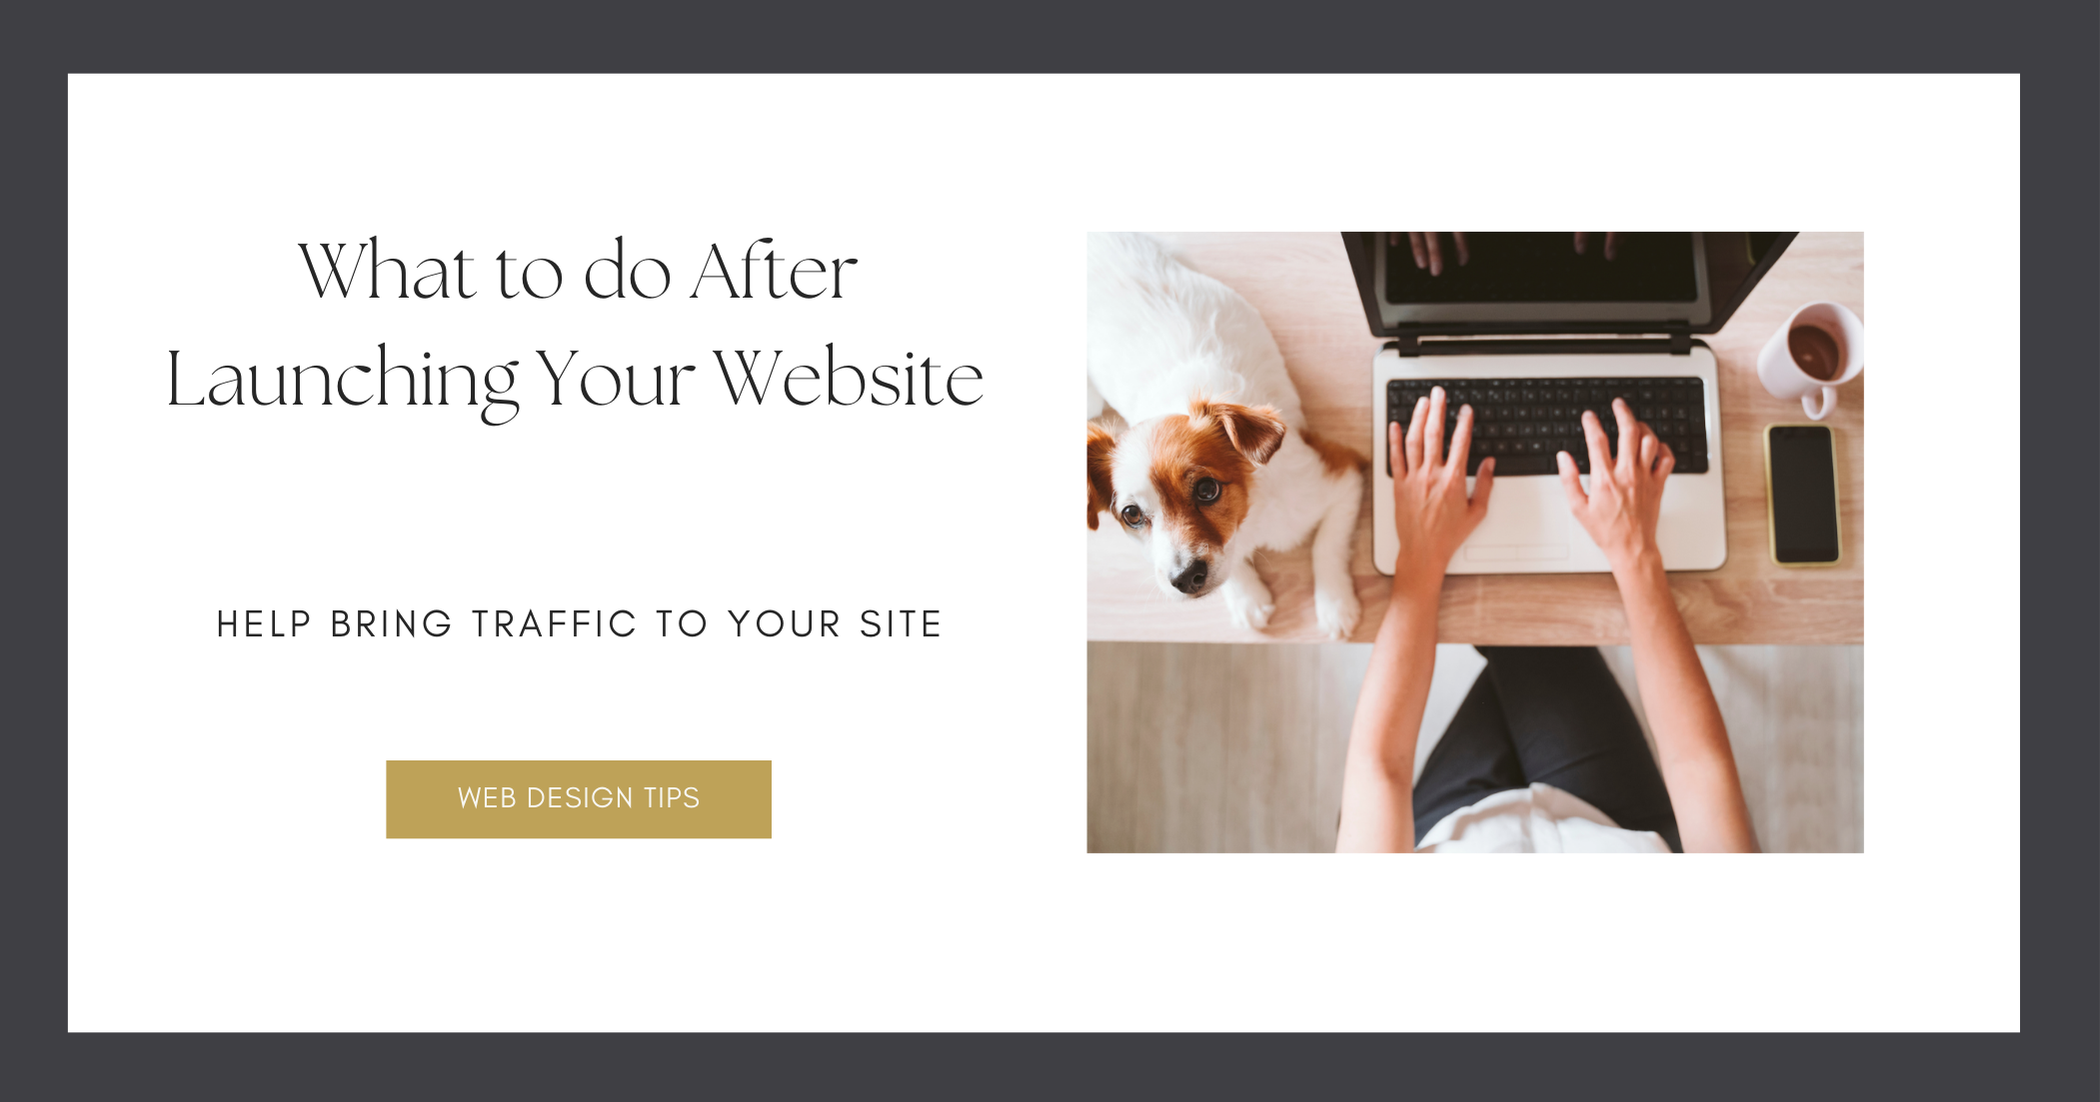
No.7 | You’ve launched! Now what?
You’ve launched your website and are ready to start for visitors and potential customers to come your way. (Congrats!) I share 4 things you ought to do once your website is live to help bring it more organic traffic. Check it out here!
If you have any questions about what I share here, feel free to reach out! I’d be happy to help!
Other resources that can help your website thrive in 2026:
FREEBIE! Claim my full Website Copy Template (that I use with my paid clients!)
Website Homepage Web Copy Tips for Counselors, Coaches, and Small Business Owners
Would you like me to design and build your Squarespace website?
If you’re ready to spend your precious time providing care for your clients (and the self-care you need!) and less time on the details of web design, I would love to come alongside you in this process.